Herewith, the shatteringly gorgeous results of my first venture into infra-red photography.
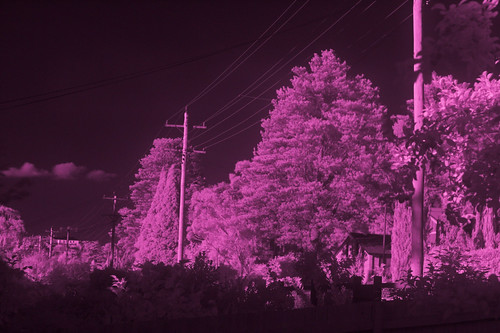
That's how it looked out of the camera, whose red photodetectors are most strongly tickled by near infrared, but whose green and blue ones see it too.
They don't see a lot of it, mind you, because like all normal digital cameras these days, my EOS-20D has an IR-blocking filter inside it, over the sensor. It's there because digital sensors are very sensitive to near-IR light, in the same way that normal film is very sensitive to ultraviolet. If something in the camera doesn't block that invisible-to-humans light, it'll haze up your photos.
(Lots of people put UV filters on digital cameras, too. That's just because UV filters are really cheap, so you can use them to protect the lens. You can get non-filtering protectors now as well, that're just a piece of glass in a filter frame. I don't think they're much cheaper, though.)
The anti-IR filter is not, however, perfect. A little light gets through. So if you put an IR-pass filter on your camera, you can still take IR pictures. You just have to use a pretty long exposure - eight seconds at f/3.5, ISO 800, for the above example.
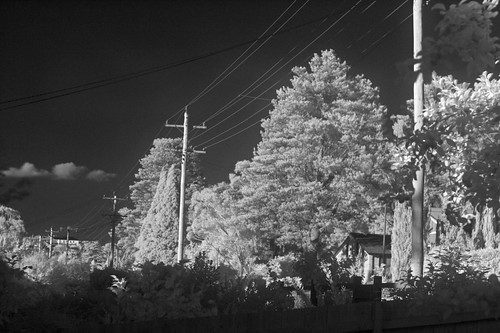
It's traditional to cancel out the meaningless colour cast from digital IR images, giving a result that looks like a black and white IR film picture, so I monkeyed with it a bit, and did.
The human eye can't see a thing through the viewfinder when the IR-pass filter is on, because on an SLR like my camera, the viewfinder looks out through the main lens. Cameras with separate "rangefinder" viewfinders don't have this problem.
I was still pleased to note, though, that the autofocus actually worked. The phase detection autofocus can see near-infrared light with no trouble - indeed, a lot of cameras use an IR beam as their AF-assist light.
The autofocus didn't quite get it right, though, because it assumes you're taking a visible-light picture, and infrared light doesn't refract as much as visible (many older SLR lenses have a red dot on their focus scale as well as the standard white one; the red one is the one you use when you're shooting IR).
You can compensate for that by cranking down the aperture to get more depth of field, but that increases your exposure time even further; the above eight second shot would have had to be 42 seconds if I'd taken it at the usually-suggested f/8. An alternative strategy is to just take a few pictures, manually bumping the focus in a bit for each one. Or, if you've got a choice of things to focus on, you can try focussing on something closer than the actual subject.
These problems almost all go away if you get yourself a camera adapted for proper IR photography (from here or here, for instance - or you can do it yourself if you're brave), with the internal filter replaced with an IR-pass, everything-else-block one and the autofocus recalibrated for IR. Now you can use the viewfinder as normal, and autofocus works. Given the plummeting price of DSLRs, it's not actually crazy for ordinary photographic hobbyists, amateur astronomers and so on to do this; it also only costs a bit of time to do a similar trick with a toy digicam or webcam. I don't have that strong a need to see the world of white trees and black eyes, though.
(Have you ever wanted to get married in a black-skied nightmare world? Now you can!)
Incidentally, if you've got a camera with an electronic viewfinder that shows you what the sensor sees, then an IR conversion will give you a live near-IR view of the world. So will a camcorder converted in the same way - actually, the 52mm filter I bought was sold for use on camcorders, but works fine on the 52mm threads of my Canon 50mm lens.
I think fully converted cameras can grab a little bit of colour in IR scenes, too. My simple screw-on filter just makes everything a shade of the same pink, so there's no data lost when you drop the image to monochrome.
The filter I bought, by the way, is an allegedly 850nm-pass model from here that cost me only $AU22.98 delivered. I've no idea what its actual spectral performance is like, but it seems to work fine, and is a lot cheaper than many brand name options.
If you want something even cheaper, you can try using layered theatrical light filters or fully exposed and developed (and thus black) colour film or something, but unless you can get offcuts of theatrical gel for free, you'll be paying more for the big sheets of the stuff that you don't need.
(I've made those goggles, by the way; they're cool. Note the new photo gallery!)
6 December 2006 at 9:57 am
Another big reason they put IR-lowpass filters on digital camera targets is because of the "transparent swimsuit" problem. (If it is a problem.) Some early digital cameras didn't have such filters, and users figured out that if they used them with IR-filters at beaches and swimmingpools, the result was... intriguing. Seems that some synthetic fibers used in swimwear are transparent at those frequencies.
Anyway, if you know what you're doing, it's possible to remove that IR-lowpass filter. Steve Green got a guy to do it for him.
6 December 2006 at 4:33 pm
You've got that a bit backwards. It's actually a high pass filter, of course, and the "early cameras" involved - well, the ones that started the moral panic, anyway - had switchable IR filters, not none.
I talk about this more here.
17 December 2006 at 6:05 pm
That is most cool. I'd been meaning to get an IR-pass filter for a while; Dan you inspired me - now I have one.
My first few pictures are in this collection. Graveyards are most appropriate places for IR photography, methinks!