July 4th handicrafts

'Tis the season for my ancient sparkler-bombs page to suddenly get a lot more traffic, as the great American combination of patriotism, capitalism and pyromania reaches its annual peak.

If you're wondering what sort of bomb we're talking about here, this video should fill you in. It was grabbed from elderly videotape by my friend Mark. Note the commentary and a brief ceiling-scorching appearance from a person who somewhat resembles me, but is much younger and thinner and has an annoying reedy voice.

(WD-40 cans don't do that any more. They probably still do if you put a little pile of thermite on top of them, though. This concludes the Extremely Dangerous Suggestions portion of this blog post.)

So, on the subject of Sparkler "Bombs" That Do Not Actually Go Bang, here's a letter I got a while ago:

I am considering building a sparkler "bomb" for the upcoming July 4th holiday here in the US. In the course of my research on how to safely construct one, I came across some other pages stating that sparklers without magnesium were substandard and would not produce the desired effect. These pages were directions for actual enclosed bombs but I was wondering if you had tried the magnesium-less sparklers in the course of your experimentation for the "fwoosh" version and whether there was a noticeable difference if you had.

The reason why I am asking is because the only sparklers I can find around here that are made with wire do not have magnesium and the ones that do are on wooden sticks.

MAV

My answer:

I think most of the combustion energy of a sparkler comes from the oxidiser-fuel combination - generally something like potassium nitrate plus dextrin, with optional extra carbon, sulfur, sawdust or whatever. The stuff that makes the actual sparks contributes relatively little to the combustion.

The spark composition obviously does contribute a lot to the great vertical whoosh of sparks you get from the standard, safe sparkler "bomb", though, so it's possible that less-sparky sparklers will make much the same noise, and much the same amount of heat, but be rather less exciting to watch.

(I've never tried wood-stick sparklers for this job either. They might work OK, if bound together with coat-hanger wire or something, but I don't know.)

It's tempting to spice up the combustion with, say, a dollop of aluminium powder such as you can buy from some paint suppliers. This might actually work well, but note that flammable metal powders can "self-confine", in which the metal chaotically melts even as it burns, causing small-to-medium explosions. That sort of thing could make a sparkler bomb significantly less safe.

Honestly, I think any sparkler that sparks reasonably well, even if it's a bit less impressive than the classic bright-white-sparks aluminium/magnesium type, should work. It's easy enough to do a small-scale test, though; make a mini-bomb of only 100-odd sparklers, and see what it does. It'll burn much slower than a bigger bomb (a full-sized sparkler bomb has a burn time of only about one second), but should still demonstrate the principle.

Can you hack Methyltris(methylethylketoxime)silane?

I got my pack of Sugru silicone moulding putty today.

I haven't come up with anything to do with it yet (I'm trying to think of an application that needs both Sugru and polycaprolactone). But I like the packaging.

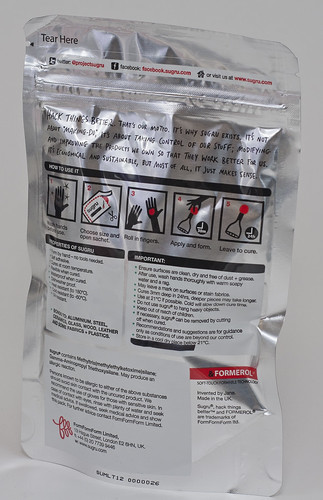
Sugru packet

To save you from going to the full-sized image on Flickr, there's a warning on the packet that "sugru® contains Methyltris(methylethylketoxime)silane; Gamma-Aminopropyl Triethoxysilane. May produce an allergic reaction".

If I was one of those people who're worried about unspecified "chemicals", I'd expect this stuff to cause complete skeletal eversion within three minutes of exposure.

Note also the blacked-out line on the package. Under the marker ink it says "Use within a year of purchase". Actually, Sugru's official shelf life is only six months. Which is a slight bummer, but I only bought one "Smart Hacks Super Pack", for £11 plus £1.26 postage to me here in Australia. So I'll probably be able to use it all before it dries up. You clearly shouldn't use the "buy a huge lifetime-supply sack for a volume discount" technique for Sugru, though.

The only thing I don't like about Sugru is the manufacturers' endless use of the word "hack". All sorts of unremarkable things are today being promoted to the status of hacks. Some of the things you can do with stuff that goes on like putty but turns into silicone rubber in 24 hours definitely qualify as hacks, but I don't think just putting a more comfortable grip on a knife, cable or nail clipper really counts.

(Several pictures in the Sugru gallery only use the stuff to put little rubber feet on some slippery object. This strikes me as a waste of this quite expensive product, since peel-and-stick self-adhesive rubber feet in all shapes and sizes are easy to find and very cheap. Sugru will probably stick better than your basic rubber foot, but since you can get more than fifty small rubber feet for about five US bucks, I think you'll have some spares.)

UPDATE:
Here are all of the Sugru pictures on Flickr, including some neat ideas. Here's the photostream of "projectsugru / Jane ni Dhulchaointigh", which appears to be some sort of aberrant composite entity formed from the woman who invented Sugru, and the product itself. There's also a Flickr group called "Sugru Hacks" which only has six images in it so far. Perhaps I should start a "Sugru I-Refuse-To-Use-The-H-Word" group.

UPDATE 2:
Apparently (PDF), methyltris(methylethylketoxime)silane is commonly used as a cross-linker in RTV silicone compositions. There are several related compounds used for the same purpose. Its MSDS (PDF) isn't very alarming.

Gamma-aminopropyl triethoxysilane, a.k.a. 3-aminopropyl triethoxysilane, seems (PDF) to be another common sealant/adhesive ingredient; it, again like several other silanes, can work as a cross-linker as well, and also as a "coupling agent" that helps polymers stick to surfaces. It seems to be (PDF) rather nastier than methyltris-blah-blah-blah. I presume Sugru contains little enough of it that most people won't suffer skin irritation. I may need to revise my plan to eat all of my Sugru, though.

(I found the above-linked PDFs on this chemical-company site.)

Before I looked this stuff up, I thought these two long-named chemicals might have been unique to Sugru. There has to be something unusual in Sugru, because it does seem to be a genuinely new product, not just some well-known industrial product being re-packaged at a huge markup for consumers, like Silly Putty or "mouse tape".

Whatever the secret herbs and spices are, though, they're not methyltris(methylethylketoxime)silane or gamma-aminopropyl triethoxysilane.

(Apparently Sugru is the first example of a "new class of silicone materials", the "Formerol" process for making which is patented. I can't find the patents, though.)

When cat toys are outlawed, only outlaws will have cat toys

A reader writes:

I've got a couple of cats, had 'em for a couple of years. I have trouble motivating them to chase their toys, ping pong balls, etc - it works once or twice a week, but otherwise they just ignore it. So I've decided to bring out the big guns and get a laser pointer.

It seems they're much harder to get in Australia since all those airplane shenanigans, even though I hardly need a galactic-range pointer.

Was wondering if you had a suggestions for where to nab a laser pointer appropriate for kitteh?

Jack

It's still pretty easy to buy your basic button-cell keychain laser pointer from electronics stores here in Australia. I think there might have been a brief drought when the new Think Of The Children Or The Pilots Or the Puppies Or Something OMG JUST BE AFRAID EVERYONE law was passed, while the stores made sure that the humble cat toys they were selling yesterday hadn't suddenly been transmuted into illegal death rays.

But basic laser pointers are easy to find now. Here's one at Altronics, here's one at Jaycar (Jaycar have several other options, too).

[There are cheaper pointers on eBay, from sellers who at least say they're in Australia, which means they shouldn't be sending your purchase through Australian Customs to be confiscated by our ever-vigilant protectors. People may still be selling cheap pointers at the markets, too. If you believe price equals quality, on the other hand, note that the writhing transporter-accident creature that absorbed both Dick Smith Electronics and Tandy (Radio Shack) in Australia will be pleased to sell you a keychain pointer for $36.98 - at "DSE" here and at "Tandy" here!]

Altronics and Jaycar both want $AU14.95 for a bloody keychain pointer, which is of course a frankly insulting price. For little more than twice that much at current exchange rates a nice man in China will sell you a whole non-contact infrared thermometer, that incorporates an aiming laser. But which I'm sure will whistle through Australian Customs, just like all of the "laser-guided" circular saws, ultrasonic distance measurers, scissors, et cetera.

I chose not to choose a $15 keychain laser. I chose something else.
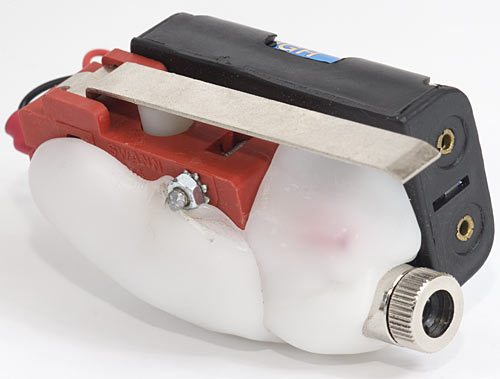
Home-made laser pointer

This prison-shiv of a laser pointer...
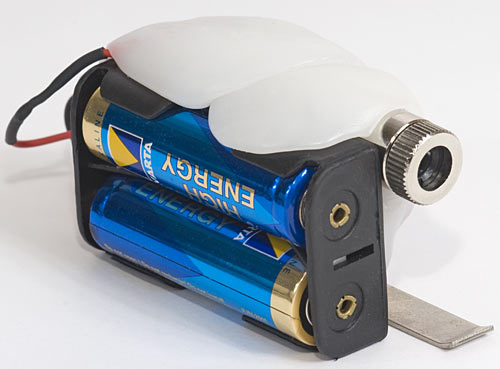
Home-made laser pointer

...took a lot longer to photograph than it did to make.

It's pleasingly bright at around 25mA current - much brighter than your standard button-cell cheapie, but not bright enough to pose any real eye hazard. It has an egg-like shape that feels good in the right hand, with a nice clicky steel switch-bar under the thumb. It has adjustable focus, so you can widen the light out into a splodge of quantum speckle at will. And it had a total parts cost about the same as the abovementioned stupidly-expensive keychain lasers. You could easily make something similar for less than $10, including the two AA batteries.

(It's quite hard to find laser pointers that take AA batteries, these days. Those little button-cell pointers are churned out by the zillion, and many pen-shaped pointers use a couple of AAAs - but if you want the substantially higher capacity-per-dollar of AA power, I think you may have to assemble your own pointer. Or, at least, hack bigger batteries onto a smaller pointer.)

The key component in a do-it-yourself laser pointer is a laser diode, lens and heat-sink assembly - commonly referred to as a laser "module", or "package".

Well, that's the key component unless your DIY ethic requires you to build the module from scratch, as well.

(The state of the DIY art has not, to my knowledge, yet reached actual home-made laser diodes. It's surprisingly easy to make your own very dim LED, though!)

There's no financial reason to build your own laser module, because you can buy ready-built modules in various shapes and sizes - even in colours other than red - startlingly inexpensively on eBay, or from dealers like DealExtreme. And no, Australian Customs won't confiscate your laser module, either - or, at least, they didn't confiscate any of mine.

Because, like an IR thermometer, a laser module is demonstrably not a laser pointer. And it is laser pointers that are illegal here, don't you know.

(I haven't tried importing a genuinely dangerous high-powered laser module, of the type used in hefty laser "pointers" that were already illegal in Australia before the current ridiculous laws went through. I would make a small wager that you would have no trouble importing such a module at all, though. But don't worry - as we all know, those scary domestic terrorists who we keep being warned about, but who mysteriously never seem to actually commit any acts of terrorism, must be so impotent on account of how they are too dumb to figure out how to connect a multi-watt invisible-beam IR laser module - you know, a laser that's actually dangerous - to a battery.

Ahem.

The question for the non-terroristic cat-toy maker is which of the (very) numerous cheap red laser modules will actually suit your purpose. I am happy to announce that I've done the legwork for you, here, for DealExtreme's range at least. I bought a few of their finest, cheapest red laser modules, and this one, yours for a princely four US dollars and six cents delivered to anywhere in the world, is the one you want.

It's got a nice big sturdy heat-sinking case, it's usefully, though not dangerously, bright from modest power, and it's got the abovementioned adjustable collimating lens, too.

The other components of a DIY laser pointer:

1: Batteries. Two AA alkalines, in this case; feel free to use some other combination if you like. (Three D cells would give you outrageously long run time.)

The batteries you choose determine which...

2: ...resistor you should use in series with the laser module.

Laser diodes, like their older relatives, the LEDs, need some kind of current limiting to prevent them from going into thermal runaway and dying very quickly. Inline resistors are usually the simplest option.

I found that the four-dollar DealExtreme module ran nicely, but not excessively, brightly from two AAs through three 91-ohm resistors in parallel, for an aggregate 30.3 ohms. I couldn't find a roughly-30-ohm resistor for the final assembly, so I used a couple of 16s in series. Small laser diodes draw only tens of milliamps, so little quarter-watt resistors are more than good enough.

If you buy some other laser module, don't just trust the "2-4.5V" or whatever that was listed on the eBay auction, hook it up to two AAs, and kill it. You'll need to put a multimeter in milliamps mode - which, remember, has a little resistance of its own - in series with the module and fiddle with batteries and, initially, larger resistance values, to find a suitable value. (That's how I ended up with three 91s in parallel - I started with one 91-ohm, which gave a very dim beam, then put another one in parallel, et cetera.)

The quick and dirty way to figure this stuff out for a laser module of unknown provenance is by starting with resistor values that're clearly much too high - by themselves, across the power supply, they'll let much less than the module's rated current flow - or by using a bench power supply that lets you limit voltage and current. Then you reduce the resistor value (or gingerly wind up the current knob) until the dot stops getting noticeably brighter. Wind it back a bit from that point and you should have a safe value. Or just stop when the dot's still getting brighter with more current, if it's already bright enough for your purpose.

Or you can, of course, sidestep all of this and just buy that DX module, and run it from two series 1.5-volt cells and about 30 ohms.

3: A battery holder. Little black plastic holders like the one I used are almost free on eBay, or you can bodge something up yourself. (Thumb-tacks make good battery contacts, by the way.)

4: A switch. I used a microswitch I had sitting around, which gives a pleasing tactile feel. Any old switch will do, though. Momentary, like my microswitch, if you want the usual hold-down-the-button kind of laser pointer, or standard "unbiased" if you want a pointer that stays on by itself.

(For about the same almost-free price as a black plastic AA-battery holders, you can get a black plastic AA-battery holder with an unbiased switch built in.)

5: Stuff to hold it all together. Solder and glue, for a more professional result; tape and positive thoughts, for a less professional one.

The weird organic-looking white stuff on my pointer is a couple of blobs of polycaprolactone plastic, about which I must digress, because it's brilliant stuff.

At room temperature, polycaprolactone is a tough white plastic, like nylon. But above about 60°C it becomes a pliable, bouncy, transparent putty-like material.
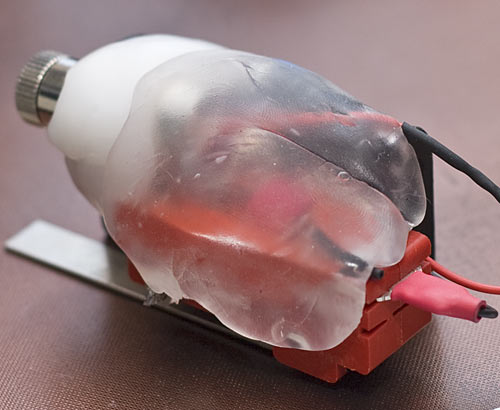
Polycaprolactone is transparent when it's hot

(This is the laser assembly before the second blob of polycaprolactone had fully cooled. It'd be fun if it stayed like that, but you can't have everything.)

You take polycaprolactone granules, and you put them in boiling water, and they turn clear and stick to each other. Just stirring the growing blob around a bit will pick up any loose pellets. Then you fish the spongy blob out and squeeze the hot water out (a slightly painful procedure), and then form the blob to suit your task, usually by just sticking it onto something and squeezing it into shape. Hot polycaprolactone sticks well to all sorts of surfaces, but not so well that you can't peel it off if you make a mistake. And you won't get scalded while doing this, because unlike water, the plastic is lousy at transferring heat to your fingers.

(If you heat polycaprolactone above 100°C, by, for instance, microwaving it instead of putting it in water, it apparently becomes a lot stickier, as well as much more able to burn you. So you might want to leave those higher temperatures to the rapid fabricators. I needed to smooth a little bit of my polycaprolactone blobs, so I wafted a small butane flame past the plastic. But then I smoothed it over with a damp screwdriver, instead of my finger.)

As polycaprolactone cools, it clouds up and stiffens, but does not appreciably shrink. If you haven't gotten your new plastic part shaped right before this happens, just pop it back in the water to re-soften. It's easier to re-shape polycaprolactone than it is to shape it in the first place, because there's less water to squeeze out. You can re-heat the plastic as many times as you like, too, and any excess can go back in the bag for later.

Polycaprolactone in the molecular weights that make it behave in this useful way is manufactured in vast quantities by at least two companies, Solvay and Dow Chemical. Which is great to know if you need a ton of the stuff, but not so much if you just want to replace a missing knob on a radio. (That was my first polycaprolactone project. It worked beautifully.)

Other companies repackage polycaprolactone in smaller quantities at large markups. "Polymorph", "ShapeLock" and "Friendly Plastic" are all polycaprolactone. The first two are very much the same; Friendly Plastic comes in a white-pellets version too, but is also available in a wide range of more-expensive coloured versions. You can colour polycaprolactone yourself, but if you need even, repeatable hues and/or metallic effects, and you don't need a huge amount of the stuff, then you'd probably do better just buying Friendly Plastic.

(The bone-white version is of course preferable, if you want to make creepy biomechanical thingummies.)

If you're in Australia and you just want to see what polycaprolactone is like, get yourself a hundred grams of "Polymorph" from Jaycar for $AU11.50. (Plus delivery, if you buy it online rather than over the counter.) That may go a surprisingly long way; I didn't weigh the Polymorph that went into my laser pointer, but judging by volume it was probably no more than 25 grams.

If you're in the States, there are lots of retail polycaprolactone sources. Try the Maker Shed.

If you're outside the States and want a larger, but not vast, amount of the stuff, many companies stand ready to rip you off.

You can place an international order at Shapelock.com and pay for it, with a pleasingly low shipping fee - and then they'll refund your money, because they don't actually ship overseas. And then they'll tell you to order from Jameco instead. Jameco's international shipping fees aren't mentioned on their site; you can place an order and give your payment info and wait for the delightful surprise, or you can e-mail them, whereupon they will inform you that their cheapest price to send a $US24.95 half-kilo of Shapelock to Australia is $US39.

Sorry. Just had to get that out of my system.

OK, here's how people outside the States - and possibly inside, actually, depending on how all the prices shake out - can buy polycaprolactone at a non-stupid price. Go to this eBay dealer in the UK (on ebay.com, on ebay.co.uk), who's currently on holiday until the 8th and has invisibilised their auctions, but will actually still let you place an order via this listing. They'll sell you 500 grams of Polymorph-branded polycaprolactone for £9.50 plus quite reasonable delivery, with a microscopic discount for multiple half-kilos.

[UPDATE: As pointed out in the comments below, that eBay dealer has a separate Web site too, from which you can download a great PDF about what you can do with Polymorph.]

To make sure I get my order in before all of y'all, I just ordered a key, man, for a total of £32.75 delivered to Australia. That's about $AU54.20, or $US49.80, as I write this.

A kilogram of polycaprolactone is quite a lot - especially when you consider the near-infinite reuseability of the stuff. Unless I suddenly start building sizeable structures, I don't anticipate having to buy any more for some years.

Jaycar offer discounts for bulk purchase, but a kilogram of Polymorph from them is still $AU89.50 ex delivery. So the eBayer in the UK looks like a good deal.

Hm. This post started out being about making a laser, and ended up about making freeform plastic bones. Eh - it'll do.

Do feel free to discuss either subject in the comments!
If only Formula 1 knew about duct tape and baling wire

Just as not everything that appears on Photoshop Disasters is an actual Photoshop disaster, and not everything on The Daily WTF is uncontroversially WTF-y, so too not everything on There, I Fixed It is actually a half-assed repair job.

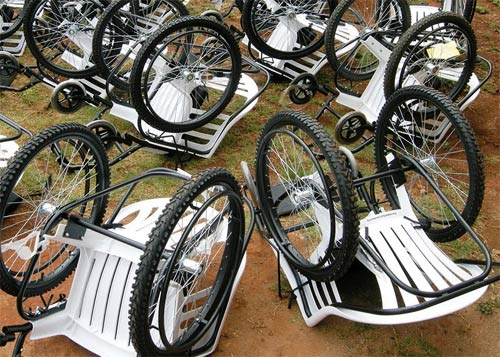
Free Wheel Chair Mission wheelchairs

These wheelchairs, for instance, may look gimcrack, but (as commenters quickly pointed out) they're actually real, functional and sorely-needed "appropriate technology".

(If it's stupid but it works, it isn't stupid.)

I think quite a lot of the other There, I Fixed It posts have a similar charm, especially to people like me who actively prefer shabby things to shiny ones. (I am not being sarcastic when I say cat-scratches "improve" furniture.) I like things that look totally ramshackle, or even obviously broken, but actually work, or can pretty easily be made to work.

Stacked-paper desk support

This desk support, for instance, rather appeals to me.

You could make it properly structurally sound, too. Just gather enough unimportant documents - not, I think you'll find, a difficult task for many people - and pile them up one sheet at a time, putting a circle of white glue on each sheet. Then put the desk or something back on top of the pile to clamp it while the glue dries.

You could make a desk that stood on four of these things, a coffee table on four short ones, a single one as a display plinth for your Office Space collectibles...

You could even make the stack lightweight, if you did something like core out the middle inside the glue-rings and replace it with a length of large-diameter PVC pipe. And then you could, of course, hide booze in it!

I invite readers to nominate their own examples of constructions and contraptions in this sort of improbable-yet-functional, broken-yet-working category.

(With pictures, if possible! Commenters can't use image tags, but if you just put the URL of the image, Flickr page or whatever in your comment I'll picturify it, provided it doesn't make my Civil Defense Lemonparty Survey Meter beep too loudly.)

My Roman Army knife

The other day I wrote about a knife switch that might actually be an antique.

Today, allow me to present a knife that could be 2000 years old!

Reproduction ancient folding knife

It's not, though. It was probably beaten out of a bit of old leaf spring or something by some bloke in China only a few months ago.

Reproduction ancient folding knife

It's about 235mm (9.25 inches) long when open, and cost me $AU11.50 delivered (about $US10.50, as I write this) from eBay dealer "The Medieval Shoppe" here in Australia. Here they are on ebay.com; here's a search that finds this "Rustic Foldable Iron Knife" in their ebay.com.au store (if they currently have any to sell), and here it is on ebay.com.

The wood of the handle was a bit rough and splintery, so I sanded it a little and applied some home-made beeswax polish.

Reproduction ancient folding knife blade detail

The blade came with a usable edge on it. I straightened the edge a bit on a steel, then touched it up with my fancy sharpening doodads. It took longer than usual to remove a tiny amount of material, so the blade is probably pretty high-carbon steel. I wouldn't be surprised if there's a lot of variation in the steel used to make these things, though.

(I cordially invite readers to start a religious war in the comments about What The One True Knife-Sharpening System is. I'll start: If you're a beginner and/or clumsy, get a sharpening kit with some sort of angle guide, like the CRKT Slide Sharp or, for blunter blades that need more material removed, a Gatco sharpening kit.)

Even without extra sharpening, this slightly-mad-slasher-looking thing's not just a bit of renaissance-faire costume kit. It's a perfectly practical tool, with a nice slim blade profile that makes it good for slicing tasks, though not a great choice for really heavy cutting, and no use at all for prying things open. And if you were to hop in your time machine with it and go back to the Roman Republic, nobody would find it particularly remarkable.

Well, actually I suspect the cap on the hinge rivet may be a bit of aluminium or stainless steel, which'd be a giveaway if someone examined the knife closely. But apart from that, this is a decent ancient replica.

(You could be onto a nice little earner there, actually. Scour handle and blade with dirt for a while, soak it in wine, soak it in oil, put it in a low oven for a little while, then bury it in the garden and water it daily for a week. And then dig it up and put it on eBay with a $500 reserve as Roman Pocket Knife Miraculously Preserved In Peat Bog. Just hope they don't carbon-date the wood.)

Reproduction ancient folding knife half-open

More intelligent readers may have figured out, from this, that folding pocket knives have been around for a surprisingly long time. Fixed-blade knives are stronger (provided they have a decent-sized tang), and simpler, and so have always been much more common. But the ancient Romans did indeed have folding pocket knives - some of quite sophisticated design.

The ancient folding knives, and indeed every known folding knife until about the 15th century, don't "lock". The blade is only held open, or closed, by friction between itself and the handle. This design makes it easy for the knife to close unexpectedly and seriously injure you if you push the blade hard into something (or someone), or if you're cutting something and the blade jams on a push stroke. A simple friction-joint knife can also come open in your pocket; hilarity may ensue.

For this reason, it's now possible to get a variety of Swiss Army knives (find more with the SOSAK "SAK Selector"!) that have a proper lock for their main blade, and not just the standard "slipjoint" arrangement that resists opening or closing of the blade, but doesn't positively lock the blade in either position.

(And yes, I am aware that some law-and-order geniuses in the UK decided to one-up the similar geniuses here in Australia and make it illegal to carry any knife with a locking blade in a public place, unless you have a "good reason". The list of acceptable "good reasons" does not appear to include "not wanting to cut my own fingers off, or stab myself in the scrotum while running for a bus".)

I wouldn't be surprised if someone 2000 years ago came up with at least a simple locking mechanism for a folding knife - like the rotating collar on the classic Opinel knife, for instance. A sliding ring, a peg that goes through holes in the handle and a slot in the blade; there are lots of possibilities that wouldn't require the precision fabrication techniques and tough steels upon which modern locking knives depend. But if someone did come up with a locking folder in 100 BC, it apparently didn't catch on.

(It's possible that many such knives were made, but didn't survive to the present day. Iron and steel items of all sorts are hard to find in archaeological digs, because iron easily rusts away to nothing over time, leaving archaeologists puzzling over the stain the rust left, and whatever parts remain, to figure out what the now-lost iron parts looked like. Older bronze-bladed knives and swords often fare a lot better. Early iron blades were actually clearly inferior to the bronze alternatives; iron was much more common than the copper-and-tin used to make bronze, but until we figured out how to make proper steel, iron swords were made of wrought iron. That material makes dandy door hinges, but lousy blades.)

My replica has a neat pseudo-lock system, though:

Reproduction ancient folding knife half-open

Reproduction ancient folding knife

There's a flattened spike on the back of the blade that stops it from opening too far, and is also easy to grip when you grip the handle, and thereby prevent the blade from closing. It's not a real lock, and it sticks out awkwardly when the knife is closed, but as a safety feature it's a lot better than nothing.

(The spike also has a little hole in it, through which you could tie a lanyard.)

Making your own knife, often from some cast-off piece of steel like an old file or a railroad spike, is a popular simple metalworking/blacksmithing project. I think a lot of people are put off the idea, though, by thinking they have to make something that's somewhere near modern commercial quality, or at least as good as a Douk-Douk or K55K.

You don't, though. You can make a knife like this with basic hand tools, a gas stove and the very cheapest of eBay Anvil-Shaped Objects, if you've already got a chunk of steel.

Or you can just buy one, of course. Either way, it's another very satisfying object.

Are you troubled by yellowed, lifeless Lego?

There I was, idly scanning eBay for Lego baseplates to maybe give to one or another child for Christmas (HOW CAN THEY NOT MAKE CRATER PLATES ANY MORE WHY WAS I NOT CONSULTED), and I noticed that most, if not all, of the plates on offer weren't very close to their original colour.

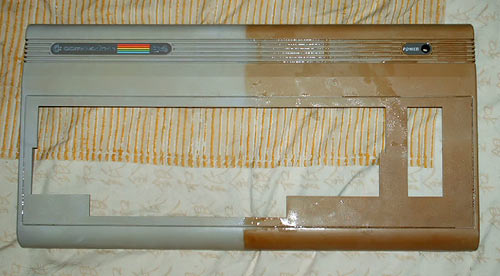
This reminded me of a thing from the other month about de-yellowing the casings of old computers and video games.

Retr0bright!

If you don't want to paint over the yellowed plastic, you can soak it in a hydrogen peroxide solution, with a dash of one or another kind of bleach. (Note that the popular "oxygen bleach" products are based on sodium percarbonate, which when added to water just gives you hydrogen peroxide plus washing soda.)

If you want to get fancy, you can make a gel concoction dubbed "Retr0bright", which'll stay where you put it. So you can bleach things without having to remove all the electronics so you can dip the casing, or bleach the outside of a thing but not the inside, et cetera.

Apparently even plain few-per-cent peroxide will often do the job if you leave the pieces to soak overnight. If you want faster results, you need 10%-to-20% peroxide, which you may or may not be able to get from a pharmacy.

(I must, at this juncture, digress and recommend Armadillo Aerospace's old video - 56Mb MPEG here - of what happens when you put high-test rocket-fuel-grade hydrogen peroxide on various common substances.)

Does this technique, I wondered, work on Lego?

Apparently, yes, it does! Even on clear pieces!

(Bleach can apparently attack the paint on some printed bricks, though.)

I don't think this will actually do the plastic any harm, either. Or any more harm, anyway. The reason why plastic discolours in the first place is because something - ultraviolet light and/or atmospheric oxygen, usually - reacts with one or more of the constituents of the plastic. The material that yellows may be the polymer itself, or it may be flame-retardant additives, or plasticiser, or something. In any case, bleaching already-damaged substances back to white shouldn't do any more damage.

[Update: I just remembered that a couple of years ago I wrote this piece, about the making of Lichtenberg figures in clear acrylic. It involves a rather unusual way to discolour plastic.]

You don't have to bother with this at all, of course. A yellowed Amiga 500 is still an Amiga 500, and yellowed Lego is still Lego. Some builders have even...

'Weathered' Lego 'mech

...used yellowed pieces to "weather" models!

Easy wood polish!

Here is how to make a (very) simple wood protectant and polish. I've had occasion to use this stuff a couple of times on things about which I'm working on blog posts [update: this knife, and this knife switch], so I thought I'd do a quick post about it.

1: Get some beeswax. It's easy to find cheap on eBay; beekeepers often seem to cast the stuff into bricks in margarine containers or something, and they usually seem to filter and wash it too.

(I got a couple of big 0.95-kilo bricks of beeswax for less than $AU30 delivered a couple of years ago, but that seller doesn't have anything on offer right now.)

2: Get some ordinary light mineral oil. Those little bottles of clear "all-purpose oil" or "sewing machine oil" you can get from the supermarket will do nicely.

3: Melt the wax and mix in the oil. Beeswax melts at a bit more than 60°C, so you don't need a lot of heat. If it's smoking, it's too hot.

You'll probably want a ratio of about five or six parts oil to one part beeswax, by volume, but there's lots of room for experimentation. To play with the recipe, or if you only need a little polish, you can make it in an old spoon, heated with a small flame or boiling water under the spoon.

This simple polish is non-toxic, food-safe and won't go rancid, and has the same pleasant faint honey smell as the wax. It's easy to vary the consistency from thick and waxy - but not as thick and waxy as straight beeswax, which doesn't really work as a polish by itself - to liquid-at-room-temperature. And it really is the work of a moment to make this stuff.

A little of this polish goes a pretty long way, so you can make as little of the stuff as you actually need - perhaps using only a tiny one-ounce block of beeswax, which are the cheapest eBay options - instead of buying a bucket of commercial polish that you'll never use all of, or a ridiculously overpriced tiny container.

UPDATE: I have now discovered that this stuff also makes perfectly good lip balm.

That's right - it's a floor wax and a dessert topping!

Preparation for the rugged outdoor life I intend never to lead

I never go camping, we have very reliable gas for cooking, and there are several overdue reviews I should be working on.

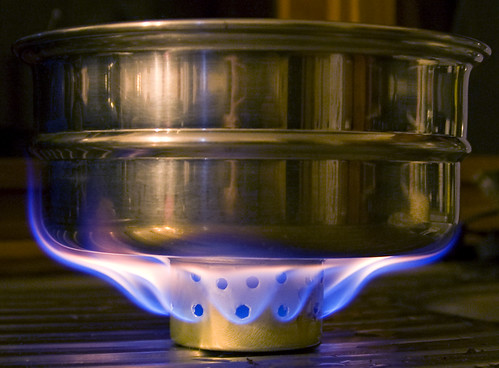
Super Cat mini-stove

So I, naturally, just made a little camp stove, after reading about it on Cool Tools.

It's called the Super Cat, because it's made from a small cat-food tin. Since this household goes through small cat-food tins so rapidly that I really should have made some sort of belt-feed system for them by now, the raw materials were not difficult to procure.

And all you have to do to make a Super Cat is poke some holes in said tin.

That's it. You're done.

And it really does work. Mine worked perfectly first try, getting three cups of water from 15°C to a rolling boil in about seven minutes, which is when it ran out of its first shot-glass of methylated spirits (denatured alcohol) fuel. It won't work that well if there's a breeze or it's colder, but a couple of cups quickly boiled per shot of fuel ought to be possible in all sorts of real-world situations.

It's not the safest possible cooker, of course. It'd be easy to set your camp-site, or yourself, on fire if the little tin fell over or the pot on top overbalanced. (You should rest the pot on three rocks, or make a support out of coat-hanger wire or something.) And there's no heat adjustment - it runs full blast for several minutes, then goes out.

But if you're going to cook with an improvised naked-flame device, going with alcohol for fuel is not a bad idea. It doesn't burn hot enough to instantly cook you if you get some of it on you, and you can extinguish it easily with water.

Then again, the flame's invisible in sunlight, which can be a little risky. If you see someone crash a methanol-fueled racing car then leap out and start dancing around and screaming, he may not just be angry.

But c'mon, whaddaya want from a cooker you can make in fifteen minutes by candle-light with only a nail for a tool?